Saturday, 6 September 2014

Canned Pears

There was a great sale on Bartlett pears earlier this week.  Bartletts are really good pears to can, as they hold their firmness well.  Pears really do well with a hot pack.  Raw pack pears can sometimes be a bit mushy, so hot packing, even though it takes more time, is totally worth it.

I made up a solution to prevent browning, by grinding up 3 Vitamin C tablets and adding the powder to 2 litres of water.

For peeling, I tried out my apple peeler but it really didn't do a very good job.  I ended up using my potato peeler and it worked like a charm.


After peeling, I cut each pear into quarters, then cored it with my paring knife.  Each quarter was then cut in half.


Once the bowl was full, I added the cut pears into a boiling sugar solution (2:1 ratio of water to sugar).  When doing this much fruit, I generally start with 2 litres of water and 4 cups of sugar.  I ended up having to add 1 litre of water and 2 cups of sugar about 2/3 of the way through the pears.

Once I added the pears to the boiling sugar solution, I had to bring them back up to boil.  Then I boiled them for 2 more minutes.


The pears were packed tightly into hot jars and topped with the sugar syrup.


I processed the pears in a boiling water bath for 30 minutes for 1-litre jars and 25 minutes for 500-ml jars.  I had to add 5 minutes to my processing time because I'm at elevation.  So, if you do not have to adjust for elevation, the processing times would be 25 minutes for 1-litre jars and 20 minutes for 500-ml jars.

Forty pounds of pears resulted in 14 1-litre jars and 2 500-ml jars.  I cut up the pears into smaller pieces for the smaller jars.


The peels, cores, anti-browning water, and leftover sugar solution will be made into Pear Syrup in the next couple of days.


Thursday, 4 September 2014

Dehydrating Lettuce

Having to harvest all the remaining lettuce at once due to the frost warning has us in a glut of lettuce.  Last week, with all the excess lettuce I had, I tried making lettuce soup.  Awful.  It was extremely bitter.  The soup might work with iceberg lettuce but not with green leafy types.

So, this time I decided to dehydrate the lettuce.  I figured I would use the crumbled lettuce a little like parsley and mix it into meat loaf and stuff like that.  I also thought that if I powder it, I could add a small amount to my protein smoothies.  Lettuce has a lot of vitamins A & C, so concentrated lettuce would be a good addition as long as it didn't affect the flavour.

First, though, I had to wash and trim the lettuce.  I remove all the tough ribs from the lettuce.  This took quite awhile.  I had a completely full sink of harvested lettuce.  You can see the sink on the left has the de-ribbed leaves.


Once I had trimmed all the lettuce, I drained the leaves and spun them in the salad spinner to dry them as much as possible.  I ended up with two large bowls of lettuce.


I distributed the lettuce on 5 trays in my dehydrator.


After 10 hours on the recommended heat setting (40ºC), I rotated the trays and let them dry a further 2 hours.


They reduced in volume by half.

However, once I crumbled the dried leaves, I was left with this:

Quite the volume change!

From the dried, crumbled leaves, I put half into a mason jar to use as is.  The other half I powdered in my nut and spice grinder.


I tried out the lettuce powder in my regular smoothie and I couldn't taste it at all.  There were little tiny green flecks, though.  I also only used about 1/2 teaspoon of the powder.


Ripening Green Tomatoes

Due to a frost warning, I had to pick my all my tomatoes.  Most of them are still quite green.  I use the box/newspaper/banana method to ripen them.


I layer newspaper and green tomatoes.


Then for the last layer, I add a ripe banana.


I'll check the tomatoes every few days and remove the ripe ones.  I'll change out the banana every now and then, too, when it gets too ripe.


Frost Warning harvest

We had a frost warning last night so I pulled the frost sensitive produce.  Here are the last of rhubarb, peppers, tomatoes, and lettuce.


Sunday, 31 August 2014

Carrot Cake Jam

My house smells like Thanksgiving right now.

Remember the carrot monster, Isabella?  Well, I promised her I would make some Carrot Cake Jam.  I found a recipe in one of my preserving books and I altered it slightly.

I took these items:


I put them all in a pot, except for the sugar and pectin.


Stirred it all up:


Boiled it gently for 20 minutes.


Added the pectin, and boiled it for 1 minute, then added the sugar.  I brought it back up to a hard boil, and then boiled for 1 minute.


Once off the heat, I kept stirring for 5 minutes.  This helps to prevent the fruit from floating to the top.

Into jars, and then into the canner.


I use my pressure canner as a boiling water canner, too, so that is why there are empty jars in the hot water.  It just helps the filled jars from moving around in the canner as they process.  Processing time for this jam is 10 minutes (I do 15 minutes as I am at elevation).  Then they need to rest for 5 minutes in the canner with the heat turned off.  I then transferred the filled jars to the counter to cool and seal.


Carrot Cake Jam

Makes six 250-ml jars

3 medium carrots, finely shredded
3 pears, peeled and finely chopped
1 can (14 oz./398 ml) crushed pineapple with juice
3 tbsp. lemon juice
1 tsp. cinnamon
1/2 tsp. nutmeg
1/2 tsp. ground cloves
1 box powdered pectin
6 1/2 cups sugar

Add all ingredients, except pectin and sugar to a pot.  Stir and bring to boil.  Reduce heat, boil gently, stirring occassionally, covered, for 20 minutes.  Add pectin, return heat to high and boil 1 minute.  Add sugar, return to boil, and boil hard, stirring, for 1 minute.  Remove from heat and stir gently, continuously, for 5 minutes.

Fill hot, sterilized jars.  Process in boiling water bath for 10 minutes.  Turn off heat and let sit in canner a further 5 minutes.  Remove jars from canner and let cool and seal.

Saturday, 30 August 2014

Canned Sweet & Sour Glazed Carrots (UPDATED)

UPDATE:  Well, these didn't turn out so well.  The carrots were way too mushy and much too sweet.  I've been using them in a cream of carrot soup but even still, they're quite sweet.  I'm going to try and cut the sweetness of the soup by adding potatoes.

I need to definitely adjust the recipe.

********************************************

Isabella is a carrot fiend in house.  I love carrots, too, almost as much as she does.  Joel and the twins like them well enough, but not to the degree that Isabella and I do.  Other than eggs, I think Isabella's favourite food is Carrot Soup.

Now, I can't really can Carrot Soup as it has dairy in it and it would be too thick to can the puree base, but I can certainly can some carrots that would be eaten as a side dish.  The family enjoys glazed carrots.  The only thing I didn't add was the cornstarch.  I figure I can add the cornstarch when I open the can up.

Starting with the carrots, I peeled and cut them up into similar-sized pieces.  The carrot peels and trimmings get bagged and frozen for later use in soup stock making.


Once the carrots are all cut up, I blanch them in boiling water.  I bring the water back up to boil and boil for 3 minutes.  I like to hot pack.  I find the vegetable or fruit retains a better firmness over raw pack.  Hot packing enables some of the air voids to be expelled from the vegetable/fruit, which then means you can pack more into a jar.  However, raw pack works well, too.  I think it just comes down to personal preference.  With this recipe, either works and the processing time doesn't change.


Once the carrots have been blanched, they go into hot, sterilized jars and get packed firmly.  I use a skinny rubber spatula to pack them in tightly.  Once packed, I add the sauce.


Making the sauce is very easy.  All you need to do is add all the ingredients to a pot and bring it up to a boil.  That's it.  Now, if I wasn't using this to can, I would also add some cornstarch to it so it would thicken, but since this is going to be processed, no cornstarch.

Here are the jars packed with carrots and the hot sauce added to them.  All I need to do is add the lids and rings, and then pop them into the pressure canner.  If you are not at elevation, the processing time is 25 minutes for pints (500-ml) and 30 minutes for quarts (1-litre) at 10 pounds pressure.  Now, because I am at elevation, I must process at 15 pounds pressure, but for the same time.  Please make sure you follow your manufacturer's instructions regarding your pressure canner.  Also, unless you have a pressure canner/cooker, most pressure cookers cannot do canning.


And, all done!


Sweet & Sour Glazed Carrots

Makes 6 1/2 litres

15 pounds carrots, peeled and cut up

2 cups (400 grams) packed brown sugar
3 cups water
3 cups orange juice
1 cup vinegar
2 tsp. ground ginger

Either hot pack or raw pack carrots into hot, sterilized jars.  If hot pack, boil carrots for 3 minutes in a pot of boiling water before packing into jars.

Add sugar, water, juice, vinegar, and ginger into a pot and bring to a boil. Pour hot liquid over carrots into jars, leaving 1-inch head space.  Process 25 minutes for pints and 30 minutes for quarts at 10 pounds pressure.



Tuesday, 26 August 2014

Peach and Mixed Fruit syrups

As promised, I've made some peach syrup from the leftover liquids from canning some peaches.

If you remember, I had 3 bowls of different leftover items: peach skins/pits, anti-browning water (made from water and Vitamin C), and sugar water.


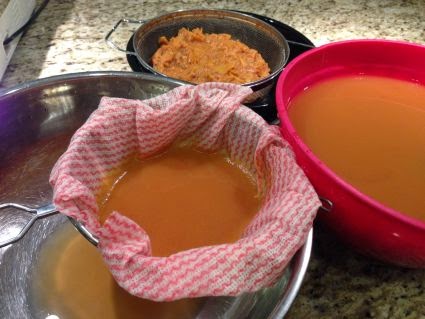
I combined all three and cooked it for about 1 hour.  Once it cooled slightly, I did the first of two strainings.  This was to mainly get the large pieces of fruit and pits separated from the juice.  Then, I started straining through a cloth to remove the fine suspended solids.


As you can see, the pulp is very fine and it clogs the cloth very easily.  I would have to rinse the cloth quite frequently.  Once all the juice was strained, I measured a ratio of juice to sugar (2:1) into a large pot.  I had 3 litres of juice (which is approximately 12 cups) so I added 6 cups of sugar.


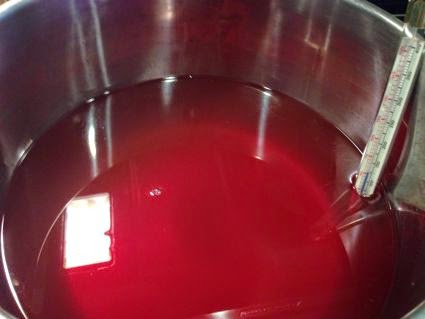
On the side of the pot is my candy thermometer.  To get a nice syrup, I shoot for around 220ºF.  In the past, it used to take me about 30-45 minutes to get there, but I'm finding I'm needing closer to an hour now.  I think it has to do with me being at elevation.  Regardless, you want to boil the mixture down until it reaches a nice syrupy consistency when you put a spoonful on a side plate.  It will cool quickly on the plate and you will be able to tell if it is thick enough.  If you cook it too long, it will turn into more of a jelly so it's not a big deal.  It will still melt on a hot waffle or a pancake.

As you get closer to the syrup stage, you must start keeping a careful eye on the heat.  As you get close, the mixture will start to foam.  If you aren't paying attention, it can boil over.  That really sucks because trying to get burnt sugar off your stovetop is a major pain (ask me how I know  LOL).


As you can see from the about picture the colour is quite deep now, and the syrup is very clear.  Off it goes into jars for processing.  Syrup needs 5 minutes in a boiling water bath (I process for 10 minutes because I'm at elevation).


So, from 3 litres of juice and 6 cups of sugar, I end up with three 500-ml jars.

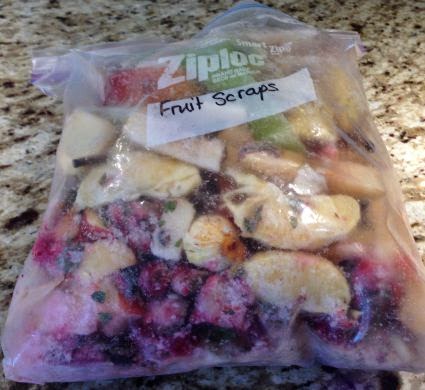
I also made some mixed fruit syrup, today.  I keep a Ziploc bag in my freezer for fruit scraps.  I toss it all in there, cores, peels, etc.  Now that the bag was full, it was time to make some syrup.  First, the fruit is covered with water in a large pot and cooked for 1 hour.  Then, I went through the same process as described above.  Following are the pictures of the Mixed Fruit syrup process.


At the end of the day, I have 3 jars each of Peach Syrup and Mixed Fruit Syrup.