Sunday 31 August 2014

Carrot Cake Jam

My house smells like Thanksgiving right now.

Remember the carrot monster, Isabella?  Well, I promised her I would make some Carrot Cake Jam.  I found a recipe in one of my preserving books and I altered it slightly.

I took these items:


I put them all in a pot, except for the sugar and pectin.


Stirred it all up:


Boiled it gently for 20 minutes.


Added the pectin, and boiled it for 1 minute, then added the sugar.  I brought it back up to a hard boil, and then boiled for 1 minute.


Once off the heat, I kept stirring for 5 minutes.  This helps to prevent the fruit from floating to the top.

Into jars, and then into the canner.


I use my pressure canner as a boiling water canner, too, so that is why there are empty jars in the hot water.  It just helps the filled jars from moving around in the canner as they process.  Processing time for this jam is 10 minutes (I do 15 minutes as I am at elevation).  Then they need to rest for 5 minutes in the canner with the heat turned off.  I then transferred the filled jars to the counter to cool and seal.


Carrot Cake Jam

Makes six 250-ml jars

3 medium carrots, finely shredded
3 pears, peeled and finely chopped
1 can (14 oz./398 ml) crushed pineapple with juice
3 tbsp. lemon juice
1 tsp. cinnamon
1/2 tsp. nutmeg
1/2 tsp. ground cloves
1 box powdered pectin
6 1/2 cups sugar

Add all ingredients, except pectin and sugar to a pot.  Stir and bring to boil.  Reduce heat, boil gently, stirring occassionally, covered, for 20 minutes.  Add pectin, return heat to high and boil 1 minute.  Add sugar, return to boil, and boil hard, stirring, for 1 minute.  Remove from heat and stir gently, continuously, for 5 minutes.

Fill hot, sterilized jars.  Process in boiling water bath for 10 minutes.  Turn off heat and let sit in canner a further 5 minutes.  Remove jars from canner and let cool and seal.

Saturday 30 August 2014

Canned Sweet & Sour Glazed Carrots (UPDATED)

UPDATE:  Well, these didn't turn out so well.  The carrots were way too mushy and much too sweet.  I've been using them in a cream of carrot soup but even still, they're quite sweet.  I'm going to try and cut the sweetness of the soup by adding potatoes.

I need to definitely adjust the recipe.

********************************************

Isabella is a carrot fiend in house.  I love carrots, too, almost as much as she does.  Joel and the twins like them well enough, but not to the degree that Isabella and I do.  Other than eggs, I think Isabella's favourite food is Carrot Soup.

Now, I can't really can Carrot Soup as it has dairy in it and it would be too thick to can the puree base, but I can certainly can some carrots that would be eaten as a side dish.  The family enjoys glazed carrots.  The only thing I didn't add was the cornstarch.  I figure I can add the cornstarch when I open the can up.

Starting with the carrots, I peeled and cut them up into similar-sized pieces.  The carrot peels and trimmings get bagged and frozen for later use in soup stock making.


Once the carrots are all cut up, I blanch them in boiling water.  I bring the water back up to boil and boil for 3 minutes.  I like to hot pack.  I find the vegetable or fruit retains a better firmness over raw pack.  Hot packing enables some of the air voids to be expelled from the vegetable/fruit, which then means you can pack more into a jar.  However, raw pack works well, too.  I think it just comes down to personal preference.  With this recipe, either works and the processing time doesn't change.


Once the carrots have been blanched, they go into hot, sterilized jars and get packed firmly.  I use a skinny rubber spatula to pack them in tightly.  Once packed, I add the sauce.


Making the sauce is very easy.  All you need to do is add all the ingredients to a pot and bring it up to a boil.  That's it.  Now, if I wasn't using this to can, I would also add some cornstarch to it so it would thicken, but since this is going to be processed, no cornstarch.

Here are the jars packed with carrots and the hot sauce added to them.  All I need to do is add the lids and rings, and then pop them into the pressure canner.  If you are not at elevation, the processing time is 25 minutes for pints (500-ml) and 30 minutes for quarts (1-litre) at 10 pounds pressure.  Now, because I am at elevation, I must process at 15 pounds pressure, but for the same time.  Please make sure you follow your manufacturer's instructions regarding your pressure canner.  Also, unless you have a pressure canner/cooker, most pressure cookers cannot do canning.


And, all done!


Sweet & Sour Glazed Carrots

Makes 6 1/2 litres

15 pounds carrots, peeled and cut up

2 cups (400 grams) packed brown sugar
3 cups water
3 cups orange juice
1 cup vinegar
2 tsp. ground ginger

Either hot pack or raw pack carrots into hot, sterilized jars.  If hot pack, boil carrots for 3 minutes in a pot of boiling water before packing into jars.

Add sugar, water, juice, vinegar, and ginger into a pot and bring to a boil. Pour hot liquid over carrots into jars, leaving 1-inch head space.  Process 25 minutes for pints and 30 minutes for quarts at 10 pounds pressure.


Tuesday 26 August 2014

Peach and Mixed Fruit syrups

As promised, I've made some peach syrup from the leftover liquids from canning some peaches.

If you remember, I had 3 bowls of different leftover items: peach skins/pits, anti-browning water (made from water and Vitamin C), and sugar water.


I combined all three and cooked it for about 1 hour.  Once it cooled slightly, I did the first of two strainings.  This was to mainly get the large pieces of fruit and pits separated from the juice.  Then, I started straining through a cloth to remove the fine suspended solids.


As you can see, the pulp is very fine and it clogs the cloth very easily.  I would have to rinse the cloth quite frequently.  Once all the juice was strained, I measured a ratio of juice to sugar (2:1) into a large pot.  I had 3 litres of juice (which is approximately 12 cups) so I added 6 cups of sugar.


On the side of the pot is my candy thermometer.  To get a nice syrup, I shoot for around 220ºF.  In the past, it used to take me about 30-45 minutes to get there, but I'm finding I'm needing closer to an hour now.  I think it has to do with me being at elevation.  Regardless, you want to boil the mixture down until it reaches a nice syrupy consistency when you put a spoonful on a side plate.  It will cool quickly on the plate and you will be able to tell if it is thick enough.  If you cook it too long, it will turn into more of a jelly so it's not a big deal.  It will still melt on a hot waffle or a pancake.

As you get closer to the syrup stage, you must start keeping a careful eye on the heat.  As you get close, the mixture will start to foam.  If you aren't paying attention, it can boil over.  That really sucks because trying to get burnt sugar off your stovetop is a major pain (ask me how I know  LOL).


As you can see from the about picture the colour is quite deep now, and the syrup is very clear.  Off it goes into jars for processing.  Syrup needs 5 minutes in a boiling water bath (I process for 10 minutes because I'm at elevation).


So, from 3 litres of juice and 6 cups of sugar, I end up with three 500-ml jars.

I also made some mixed fruit syrup, today.  I keep a Ziploc bag in my freezer for fruit scraps.  I toss it all in there, cores, peels, etc.  Now that the bag was full, it was time to make some syrup.  First, the fruit is covered with water in a large pot and cooked for 1 hour.  Then, I went through the same process as described above.  Following are the pictures of the Mixed Fruit syrup process.


At the end of the day, I have 3 jars each of Peach Syrup and Mixed Fruit Syrup.


More from my garden

The nights are getting colder and my garden is definitely showing its reaction.  The beans and peas have stopped producing.  I took the last of the beans and peas from the garden and pulled the plants.  I picked some tomatoes and peppers but I still have some on the plants.  I'm hoping I'll get a few more ripened before I have to pick them and ripen them inside.  My cucumbers were a bust.  I have 2 cukes.  Weird-looking ones at that, too. The pattypan squash and acorn squash were duds.  I think I have to have larger transplants.

Lettuce, on the other hand, is doing really well.  I harvested a bunch and I still have quite a lot still growing nicely.  I think I'm going to try an old French recipe for lettuce soup.  It is supposed to resemble cream of broccoli soup.  We'll see, I guess.


When I picked my cherry trees, there were some that weren't ripe so I left them.  I picked those now and froze them on a baking sheet.  I also picked the last of my raspberries.  I really have to read up on raspberry bushes because they weren't very good producers last year and this year.  I also froze the raspberries.  Today, I took the frozen fruit and put them into Ziploc bags.


What's still left?  For fruit, I have apples, chokeberries, and one small harvest of rhubarb.  For vegetables, I have more beets, more lettuce, some tomatoes, some peppers, carrots, and parsnips.


Friday 22 August 2014

Peaches - Round 2

When we got back from Penticton 1 month ago, I brought back 40 pounds of peaches and canned them.  Well, it's been a month and the kids and Joel have gone through half the jars already!    So, I kept an eye out for a sale and snagged one earlier this week.  I picked up another 40 pounds.  They were a bit on the smaller side (read: more work in peeling) and little hard (needed a couple of days to sit and ripen), however, they were the "freestone" variety.

Peaches come in "freestone" and "clingstone." As the names imply, the peach flesh will come away from the pit easily with the freestone and cling to the clingstone.  So, when canning in large quantities, freestone is preferable.  Clingstone are tastier as a fresh eating peach, though (at least, in my opinion).

First things first was taking off all those stupid little stickers.  This was a good job for Isabella, my main kitchen helper.  After the stickers were gone, the peaches went into a pot of boiling water (about 20 peaches at a time -- remember, these are small peaches) for about 2 minutes, and then plunged into an ice water bath. Doing this loosens the skins and makes them easier to peel.  I forgot to take pictures of this, though.

I also prepared a solution to stop the browning of the peach slices.  I use Vitamin C and water.  For 2 litres of water, I crush 3 tablets of Vitamin C.


For 40 pounds of peaches, I ended up with 3 big bowls of peaches.  I made a fresh solution for each bowl of peaches.


Using a paring knife (and my good one this time, not the cheapass steak knife ), I would peel a peach, slice it, and drop it into the anti-browning solution.  You can see how easy it is to pop the slices away from the freestone pit.


Once I went through about half a bowl of peaches, I would put the sliced peaches into a hot syrup solution.  I use a ratio of 2:1 water-to-sugar, and I like to hot pack my peaches.  I find the peaches have a better texture in a medium syrup and also being hot packed.  Hot packing peaches tightens up the peach flesh by exhausting the air voids, resulting in a firmer fruit.  Plus, you can pack more fruit into a jar.  You will also get less floating at the end.

I put the peaches into the boiling syrup and then bring it back up to boil. Once they are boiling, I take the pot off the heat and pack the fruit into jars.  I repeat this process until I have enough to fill my canner.


For 1-litre jars, you have to process them in a boiling water bath for 25 minutes (I do 30 minutes because I am at elevation).  For 40 pounds of peaches, I ended up with 13 1-litres jars and 1 500-ml jar.


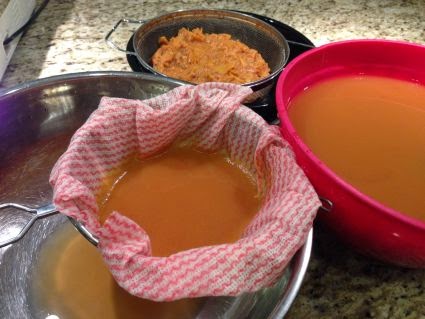
Now, you might think I am done with this bunch of peaches.  But, nope, not me.  After all the peeling, slicing, cooking, etc, I am left with a big bowl of peach pits and skins, 6 litres of peach juice-infused anti-browning solution, and about 6 cups of peachy sugar syrup.


There are a couple of things you could do at this point.  With the syrup, you could strain it, then boil it down either to the syrup point or the jelly point.  With the peach water, you could strain it, then add some sugar (or Splenda) and drink it (remember, all I added was crushed Vitamin C).  The peach water has quite a bit of natural peach juice in it now.

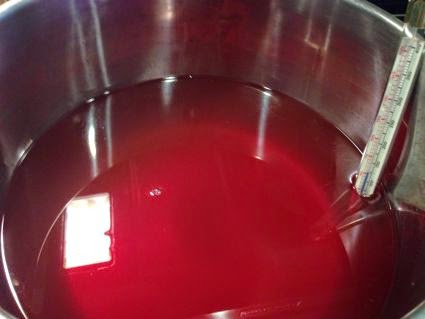
Ah, I hear you asking yourself, "What about the skins and pits? They look all slimy and gross."  Yep.  They are.  However, they still have a lot of peach bits on them.  I will mix all three together, simmer the resulting peach stew for about an hour, strain it, add more sugar, and then boil it down into a delicious syrup for pancakes.

You know that horde that has gone through half of the original batch of canned peaches in less than a month?  Well, they also eat a lot of pancakes. 

Syrup making is another post, though.  For now, the leftover peach stuff is sitting in my fridge.  I'll probably boil it tonight, but make the syrup on Sunday.